As a Mac user, I spend most of my time using Safari for my work. Grammarly for Safari is a savior to help me eliminate errors.
If you are someone who spends most of your time on Safari, you will love how easy and excellent Grammarly’s extension is for Safari!
In this article, I’ll walk you through all the details of Grammarly for Safari extension, including how to install it, how to use it, and even tips to use Grammarly at its best on your Mac!
So, let’s get into the details!
Pros and Cons of Grammarly For Safari
Grammarly works seamlessly on Safari. Here are a few pros and cons.
Pros
- Easy to use and install
- The interface is clean and easy to understand
- Works everywhere you type
- Checks plagiarism with Premium
- Comes with Generative AI
- Can be used for free
Cons
- Sometimes, it lags when using it on Google Docs
- Doesn’t work in offline mode
How Can You Add Grammarly To Safari?
Using Grammarly for Safari seems easy.
Wait until you find out how quick it is to add Grammarly to Safari.
Here is a step-by-step guide to install the extension on Safari in not more than five minutes!
Note: Your operating system must be updated to iOS 15 for the extension to work. If you have the older version installed, there are chances it might not work.
Step 1: Download the Grammarly application by clicking on the link Here.
Step 2: Tap on the download icon and the application will be downloaded automatically. Tap open once it is downloaded.

Step 3: A pop-up window will appear by Grammarly. Tap on the “ok, got it” option.

Step 4: Open Safari, and the extension will automatically be installed.
Note: you don’t need to take any other steps. The extension will start working automatically. However, if you don’t see the icon, you can try restarting your Safari.
Grammarly For Safari: What Does It Offer?
Grammarly being an AI-powered writing assistant, has innovative ways to help users.
One of the primary reasons why I love Grammarly is because of its extensions -Safari specifically.
The Safari extension for Grammarly allows you to use Grammarly on any website you are typing. Previously, I had to use the browser version by visiting the Grammarly website. Not only is it time-consuming, but it also messed up formatting in terms of tables, numbers, and more.
This is where Grammarly’s Safari extension saved me from the hassle!
You can enjoy all the perks of the tool without leaving the website you are working on, saving you plenty of time and making editing faster. For example, if I’m writing a post on LinkedIn, I can simply correct my grammatical mistakes and other errors with a click of a button.
Furthermore, it comes in handy when you are writing something and need a quick correction. Its real-time suggestions allow you to polish your content on the go.
You can use Safari’s extension for Grammarly for:
- MS Word
- Google Docs
- Gmail
- YouTube
- Yahoo, and more.
Simply put, the Safari extension works wherever you are typing!
Want to know how Grammarly works overall? Check out my Grammarly Review!
How to Use Grammarly For Safari (Expert Way)
Using Grammarly on Safari does not require any learning curve.
Once you enable the extension, Grammarly will automatically be connected to anywhere you write as long as you have an active internet connection.
Let’s take an example.
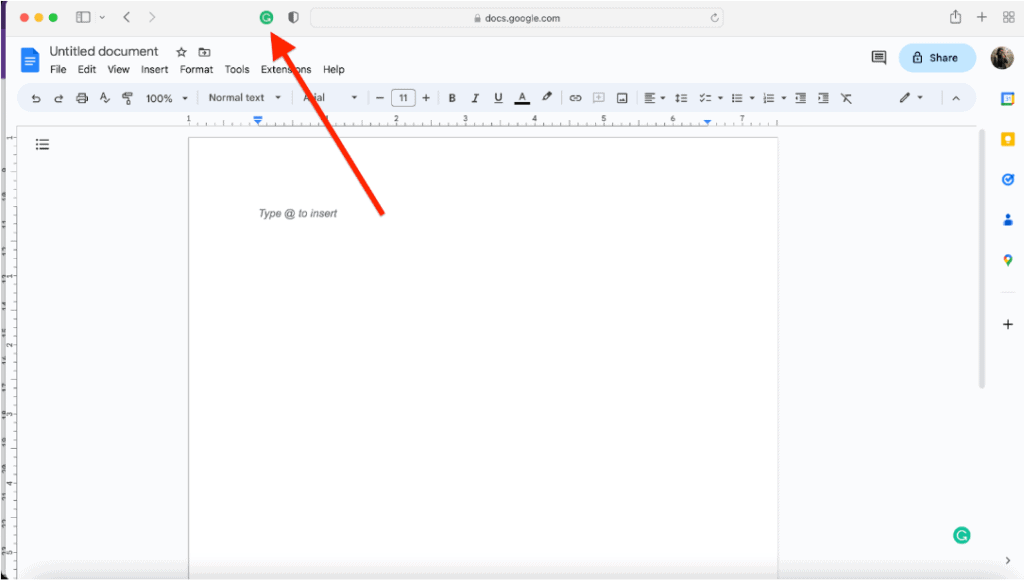
Here, I’m using Google Docs to write my content, and I want to use the extension.

The Grammarly logo will be visible on the top of your Safari. You can simply tap on the “G” above.
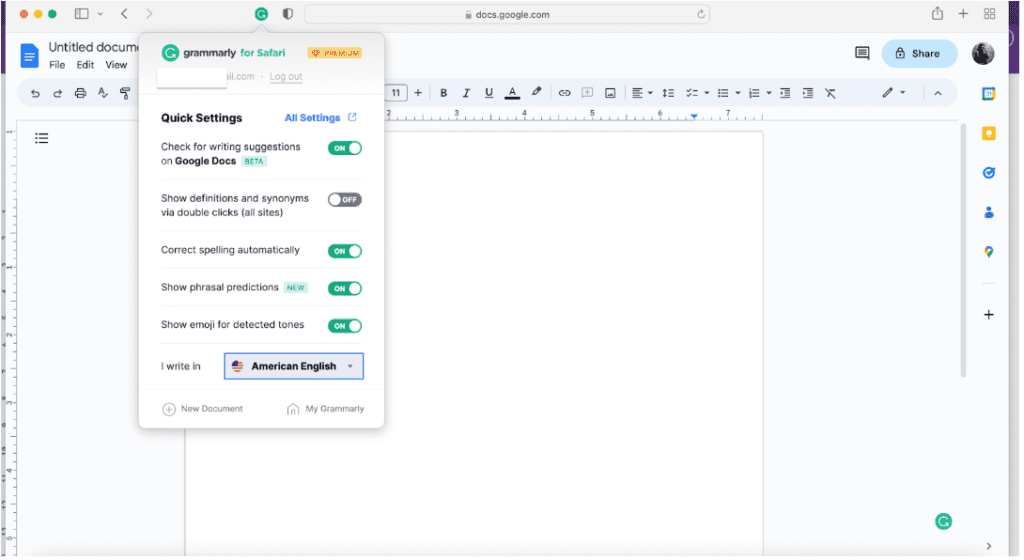
The green color indicates that it is active. You can tap on the logo to see the settings.

From here, you can customize the settings, and it will be applicable everywhere else.
Similarly, you can click on the “My Grammarly” option, which will redirect you to Grammarly’s settings page, where you can customize additional settings.
The errors will be underlined with different colors. You can tap on them to make changes or choose to dismiss them.
For example, if you want to write an email, the extension will automatically detect the errors once you start writing your email.
Here is how it works for me.

As you can see, it underlines the errors inside the email.
Similar to other websites, you can tap on the Grammarly icon below, and it will suggest the correction. You can either accept or dismiss them.
These were just two use cases of Grammarly.
The Safari extension works similarly on other websites, too. You don’t need to figure out any different way to use the extension.
How to Check For Plagiarism on Grammarly For Safari
Checking for plagiarism on Safari through Grammarly is the same as other Grammarly interfaces.
You can head over to Grammarly and paste your content. At the bottom left, tap on “plagiarism.”

Grammarly will automatically scan your content against millions of other web pages and let you know if there is any plagiarism. Additionally, you will also get the source of the copied content.
Is Grammarly Safari Extension Secure To Use?
Grammarly abides by all the security protocols. When you install the Grammarly Safari extension, it does ask for access. However, you can read Grammarly’s entire security disclosure here.
Remember, in the end, you are using a tool that runs through the internet. Make sure to avoid giving it any sensitive information.
Grammarly For Safari vs Grammarly For Chrome: Which is Better?
Now that you know how the Safari extension can be installed and how you can use it, it is time to understand the extension better.
Similar to Safari, Grammarly also has an extension for Chrome that works similarly.
However, if you are someone who uses Chrome and Safari, you must be wondering which extension works better than the other.
Let me help you make the decision easier.
As a Grammarly user for the last three years, I have experimented with both extensions.
Installing the Grammarly extension on Chrome is as simple as Safari, and the process has no major differences.

You can see this from the screenshot above. The extension is visible on the extension tab of your Chrome.
The way Safari displays the Grammarly icon on the top, Chrome doesn’t follow the same. Instead, you will see the Grammarly logo below.
This is how Gmail works with the Grammarly Chrome extension:

As you can see, there is no difference in the interface or use case. The interface and working are similar for both browsers, so you don’t have to worry about which offers a better interface.
Generally, I prefer the Chrome browser to Safari, but that doesn’t mean Grammarly’s extension for Safari falls behind.
If you use Safari as your default browser, you can use the Safari extension and enable Grammarly everywhere you write.
On the other hand, if you are a Chrome user, the Grammarly extension for Chrome will also work amazingly.
You can check out the complete guide on how to use the Grammarly Chrome extension to use the extension to its best potential.
GrammarlyGO on Safari
GrammarlyGO is a bonus to enhance your existing writing skills or create content with a click of a button.
The Generative AI feature works similarly to other AI chatbots, where you can give prompts, and it will automatically help you generate new content from scratch.
The free version gives you up to 100 prompts, whereas the premium version gives you up to 1,000 prompts. You can use GrammarlyGO on Safari everywhere you type!
- I tested and reviewed GrammarlyGO. You can read my GrammarlyGO review to see if it’s worth trying out!
Grammarly For Safari: Should You Upgrade to Premium?
Grammarly extension for Safari is free to install. Similar to the normal Grammarly version, you can use the free version or upgrade to the premium version.
While the free version will give you all the basic features, the premium version will give you advanced features to enhance your writing. You can read my detailed comparison of Grammarly Premium vs Free to know the difference.
The premium version starts at $12/month when you opt for the annual plan. For the detailed Grammarly pricing breakdown, you can head over to this article.
Since you have made it so far, we have an exclusive bonus for you! You can get Grammarly at a discounted price with our official Grammarly Discount.
Final Verdict: How To Use Grammarly For Safari
As a Mac user, if Safari is your go-to browser, Grammarly’s extension for Safari can help you in numerous ways.
Personally, it has helped me save time in checking my content as I can simply tap on the errors while I write something.
If you were wondering how Grammarly for Safari works, I hope this guide helped you by giving you complete clarity.
You can also read how to use Grammarly on Mac to understand how you can use Grammarly at its complete potential on your Mac!
FAQs
I have been using Grammarly’s Safari extension for years now. Until now, I haven’t encountered any security issues, nor have I faced any trouble. So, installing the extension on Safari is safe.
You can use Gramarly’s free version via the Safari extension too. There is no compulsion to have the premium version only.
If Grammarly for Safari is not working for you, check your operating system. Your iOS must be updated to 15, or else it won’t work. If it is updated and the extension is still not working, try reinstalling it once.
You can enable Grammarly’s Safari extension on Google Docs by tapping on the Grammarly icon at the bottom-right of your screen. Once you tap on Grammarly’s logo, it will automatically detect the mistakes and underline them.
